
UI testing is a critical part of any modern web application. My favorite testing framework is Cypress which enables you to write clean, fast and reliable tests. It consists of two main commands:
cypress run: Runs Cypress tests from the CLI without a GUI. Used mostly in CI/CD.cypress open: Opens Cypress in an interactive GUI. Used for local development.
I like to dockerize my entire application so it can be run anywhere (my machine, coworker’s machine, CI/CD, etc.) and Cypress is no exception. We’re going to dockerize the cypress run and cypress open commands for a simple Todo application written in Django and Next.js (check out the source code).
Our application has a simple docker-compose.yaml file. Note, NEXT_PUBLIC_BACKEND_HOST tells the frontend where the backend is located.
services:
  backend:
    build: ./backend
    ports:
      - '8000:8000'
    ...

  frontend:
    build: ./frontend
    ports:
      - '3000:3000'
    environment:
      - NEXT_PUBLIC_BACKEND_HOST=http://localhost:8000
    ...
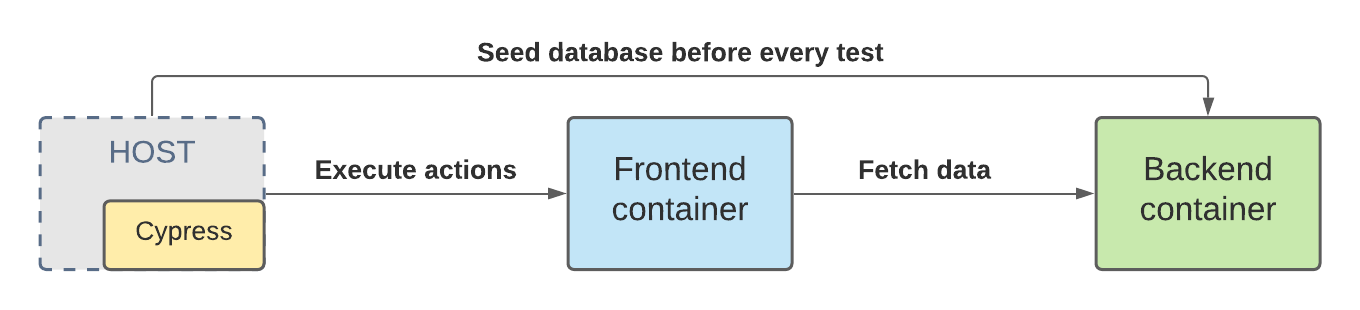
We’ll first review how to run Cypress on our host because it’s similar to running it in docker. If you’re new to Cypress, it may be helpful to review the Getting Started documentation.
Run Cypress on Host
Assuming you’ve installed Cypress, ensure your package.json file contains the following npm scripts:
{
  "scripts": {
    "cypress:open": "cypress open",
    "cypress:run": "cypress run"
  }
}
Set any environment variables you need. We have two:
export CYPRESS_BASE_URL=http://localhost:3000
export CYPRESS_BACKEND_URL=http://localhost:8000
CYPRESS_BASE_URL tells Cypress where the frontend is located. CYPRESS_BACKEND_URL tells Cypress where the backend is located, which is a custom variable we’re using to seed the database. There are several other ways to set environment variables if you prefer a different approach (e.g. file-based).
Next, update your cypress.json file with your desired configuration. Cypress includes a vast list of configuration options. Below we’re enabling retries in the run command to reduce test flakiness.
{
  "retries": {
    "runMode": 2
  }
}
Next, spin up the application which includes both the frontend and backend:
docker compose up -d
Now we can run cypress open and cypress run with the following commands, respectively:
npm run cypress:open
npm run cypress:run
Run Cypress in Docker
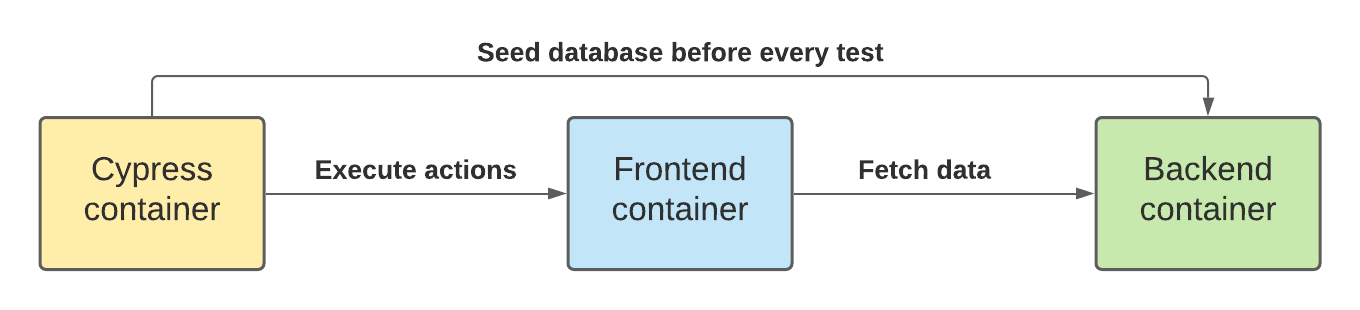
Let’s package our tests into a lightweight, portable and isolated docker container just like the rest of our application.
First, find the latest tag for the cypress/included image on DockerHub. It doesn’t have an actual lastest tag so we’ll need to hardcode the value. Note, Cypress has several different docker images but cypress/included includes everything we need.
cypress run
Create a new file called docker-compose.cypress-run.yaml which will extend our original docker-compose.yaml file:
services:
  frontend:
    environment:
      - NEXT_PUBLIC_BACKEND_HOST=http://backend:8000

  cypress:
    image: cypress/included:<TAG>
    volumes:
      - ./frontend/cypress:/cypress
      - ./frontend/cypress.json:/cypress.json
    environment:
      - CYPRESS_BASE_URL=http://frontend:3000
      - CYPRESS_BACKEND_URL=http://backend:8000
    depends_on:
      - frontend
The CYPRESS_* and NEXT_PUBLIC_BACKEND_HOST environment variables look similar to the values we set earlier. The only difference is we’re using the container name for each hostname instead of localhost:
http://localhost:3000->http://frontend:3000http://localhost:8000->http://backend:8000
This is how containers talk to each other in docker compose. Read Networking in Compose if you’d like to learn more.
Now we can run our entire stack with one command using docker. Awesome!
docker compose \
  -f docker-compose.yaml \
  -f docker-compose.cypress-run.yaml \
  up --abort-on-container-exit
The --abort-on-container-exit option stops all containers when the Cypress tests are complete; otherwise the containers continue to run and the command hangs.
cypress open
cypress open is more involved because it contains the interactive GUI. We have to forward this GUI from the docker container to our host using an X server, which is a program that is responsible for drawing GUI’s on our screen.
Setup X server
This only describes how to setup X server on MacOS. Comment below if you figure out how to set this up on a different OS.
- Install XQuartz, which is an X server distribution for Mac, with
brew install --cask xquartz. - Open XQuartz with
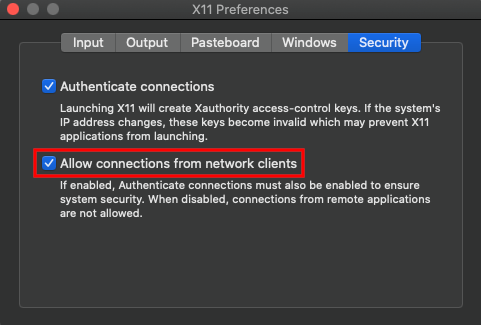
open -a XQuartz. - In the XQuartz preferences, go to the Security tab and make sure “Allow connections from network clients” is checked. Quit & restart XQuartz (to activate the setting).
- Run the following command in the terminal to allow our host to connect to X server.
$ xhost + 127.0.0.1
127.0.0.1 being added to access control list
- Set the
DISPLAYvariable, which we’re going to pass to our Cypress docker container. This tells X server to forward the interactive GUI tohost.docker.internal, which is a special DNS name that points to our host (read more about it here).
DISPLAY=host.docker.internal:0
Run cypress open
Create a new file called docker-compose.cypress-open.yaml which will extend the docker-compose.cypress-run.yaml file from earlier:
services:
  cypress:
    entrypoint: cypress open --project .
    environment:
      - DISPLAY
The cypress/included docker image’s entrypoint is cypress run so we need to overwrite that with cypress open. We also need to append --project . so Cypress can find the project files.
Now we can run our entire stack with one command:
docker compose \
  -f docker-compose.yaml \
  -f docker-compose.cypress-run.yaml \
  -f docker-compose.cypress-open.yaml \
  up --abort-on-container-exit
Cypress is running in docker but we can interact with the GUI on our host. Cool! Keep in mind, the Cypress GUI in docker doesn’t look as good as it does on host so I generally stick to cypress open on host.
I love running as much of my application in docker as possible. It’s easier to manage and allows me to spin up entire applications with a single command.